Your patio is an extension of your home, it’s where you host gatherings, unwind with morning coffee, or watch the sunset. Choosing the right patio tile ideas can make the difference between a space that looks tired after two seasons and one that stays beautiful for decades. Whether you’re planning a complete overhaul or refreshing worn pavers, the material, color, and layout you pick will affect durability, maintenance, and curb appeal. This guide walks you through popular tile materials, design combinations that actually work, installation patterns, upkeep strategies, and how to balance budget with long-term value.
Table of Contents
ToggleKey Takeaways
- Porcelain and ceramic tiles are durable patio tile ideas, with porcelain offering superior frost resistance for cold climates while ceramic provides budget-friendly color variety.
- Natural stone and concrete alternatives each have distinct tradeoffs—granite and slate offer longevity but require sealing, while stamped concrete delivers stone aesthetics at half the cost.
- Light-colored neutral palettes make small patios feel larger and stay timeless, while straight-running bond and herringbone patterns balance visual appeal with installation practicality.
- A sloped substrate, proper thin-set mortar application, and professional installation prevent costly water pooling, cracking, and early failure in patio tile projects.
- Regular sealing (every 1–3 years) and annual pressure washing are essential to protect patio tiles from staining, freeze-thaw damage, and mold buildup.
- Budget ranges from $3–8 per square foot for ceramic to $20–40+ for luxury stone, with labor adding $10–30 per square foot—compare multiple contractor quotes for best value.
Popular Patio Tile Materials and Finishes
Ceramic and Porcelain Options
Ceramic and porcelain tiles are workhorses for outdoor patios. Both are fired clay, but porcelain is denser, fired at higher temperatures, and absorbs less water, making it more frost-resistant in cold climates. If you’re in a region with freeze-thaw cycles, porcelain is the safer bet.
Ceramic tiles are lighter on the wallet and come in endless colors and glazes. They’re suitable for mild climates where standing water and ice aren’t constant concerns. Glazed finishes offer vibrant colors but can become slippery when wet: look for slip-resistant ratings (ASTM D2047) if you have kids or older family members. Matte or textured finishes grip better underfoot and hide dirt between cleanings.
Size matters too. Larger tiles (12″ × 24″ or bigger) create a more spacious visual feel and have fewer grout lines to maintain and seal. Smaller tiles (8″ × 8″ or 6″ × 6″) are easier to handle and replace individually if one cracks, though they require more grout work. For a standard residential patio, 12″ × 12″ or 18″ × 18″ tiles strike a practical balance.
Natural Stone and Concrete Alternatives
Natural stone, slate, granite, limestone, and travertine, brings timeless character but demands honest conversation about cost and care. Granite and slate are incredibly durable and age beautifully, but they’re pricey and require periodic sealing. Travertine has a warm, organic appearance and offers natural slip resistance due to its porous surface, but it’s softer than granite and needs regular maintenance.
Limestone is budget-friendly and attractive, but it’s also softer and prone to staining and weathering, especially in wet climates. If you love the look, be prepared to seal it annually.
Concrete pavers offer flexibility and value. Stamped concrete can mimic stone or brick without the weight and expense of the real thing. Stained concrete opens creative color possibilities. The drawback: concrete cracks over time as ground shifts and water freezes within it. Once cracked, repair is visible or requires replacement. In freeze-thaw zones, air-entrained concrete (designed with tiny air bubbles) resists damage better.
Permeable or porous pavers are another option if drainage and environmental impact matter to you. They allow water to drain through rather than pooling, reducing flooding risk and runoff. They cost more upfront but often qualify for stormwater management rebates in some jurisdictions. Check local codes, some municipalities encourage or require permeable surfaces in new construction.
Color and Pattern Combinations That Work
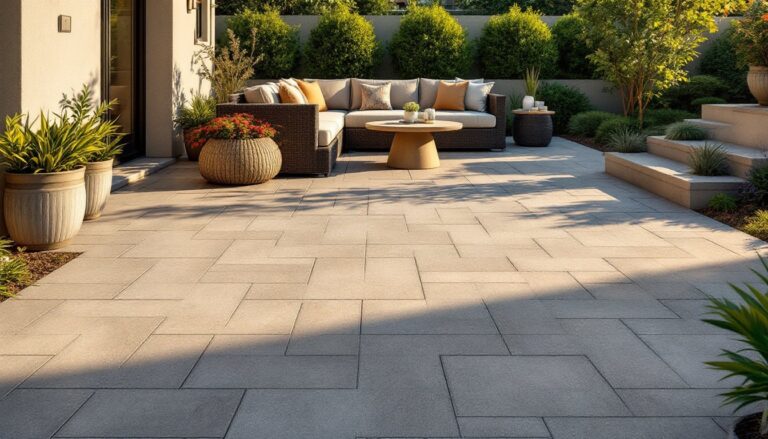
Color sets the mood. Light colors (creams, grays, soft taupes) reflect heat and make small patios feel bigger: they’re popular in hot climates and modern designs. Dark tiles absorb heat, which can be uncomfortable underfoot on summer afternoons, but they hide dust and dirt and work beautifully in contemporary or moody schemes.
Neutral palettes are timeless for a reason. A mix of warm grays with cream accents, or soft beige with charcoal borders, stays relevant and pairs well with changing furniture or landscaping. Earth tones, warm browns, rust, and terracotta, evoke Mediterranean or Southwestern character and age gracefully.
For pattern, a straight-running bond (tiles offset like bricks) is the default, works with any tile shape, and hides layout flaws. A herringbone pattern creates dynamic visual interest and can make a narrow patio feel wider, though it uses more cut tiles and labor. A checkerboard with two contrasting colors adds classic punch, pair dark and light neutrals for sophistication, or lean into color if the rest of your outdoor décor is bold. The Houzz tile patio collection showcases thousands of combinations from professional designers to spark ideas.
Mix materials thoughtfully. A border of contrasting tile, or a band of stone around the perimeter, frames the space without overwhelming. Avoid more than three colors unless you have a cohesive scheme in mind, too many competing hues read chaotic. Consider your house color, roof, and existing hardscaping (walkways, deck rails, fence). The patio should feel like a conversation, not a argument.
Design Layouts and Installation Patterns
Layout starts with a site plan. Measure your patio footprint, note the orientation (which direction gets morning sun, afternoon shade), and mark fixed obstacles like posts, steps, or utilities. This prevents awkward slivers of cut tile at edges, a common DIY headache.
Begin laying out tiles from the center or primary sightline (the view from your main exit door) and work outward. This ensures full tiles dominate visible areas and cuts are hidden at perimeter or under furniture. Dry-lay your pattern first, actually place tiles on the ground in your proposed layout, before mixing mortar. It sounds tedious, but it catches mistakes and helps you adjust spacing or pattern on the cheap.
For installation, you’ll need a proper substrate. Concrete must be clean, dry, and level (slope slightly, about 1/8″ per foot, for drainage). Loose soil isn’t acceptable: compacted gravel or a concrete base prevents settling. Use thin-set mortar (modified or unmodified depending on tile type) applied with a notched trowel to create consistent ridges for proper coverage. Gaps are filled with grout afterward: choose sanded grout for gaps wider than 1/8″ and unsanded for narrow joints. Both need sealing on porous tiles to prevent staining.
If the patio is more than a couple hundred square feet or the ground is uneven, hire a professional. DIY tiling is doable but mistakes, poor slope, weak mortar coverage, lippage (tiles not flush), lead to water pooling, cracking, and early failure. A licensed contractor’s investment often pays for itself in durability. Check local codes: some jurisdictions require permits for patios over a certain size or load-bearing requirements if you’re building on a hillside.
Maintenance Tips for Long-Lasting Patio Tiles
Maintenance separates a patio that lasts 20 years from one that deteriorates in five.
Sealing is non-negotiable for natural stone and certain concrete pavers. Seal before grouting (it protects grout lines) and reapply every 1–3 years depending on foot traffic and climate. A quality sealer costs $100–300 for an average patio and prevents staining, efflorescence (white powdery deposits), and water intrusion that causes freeze-thaw damage. Test the seal by dropping water on the tile: if it beads, you’re good. If it soaks in, reseal.
Clean regularly. Sweep debris weekly to prevent mold or algae buildup in shaded areas. Pressure wash annually, use 1500 PSI or less to avoid damage, or scrub with a deck brush and mild detergent. Avoid acidic cleaners (vinegar, lemon) on natural stone: they etch the surface. For stubborn stains, consult the manufacturer’s care guide.
Address weeds and moss. A polymeric or caulk-based joint filler between pavers prevents weeds and sand loss better than standard sand. In damp climates, moss grows on tiles: use a mildewcide or pressure wash annually. Stagnant water is the culprit, so ensure drainage is working.
Inspect grout and caulk annually. Cracks in grout allow water penetration: chip out failed sections and re-grout. If structural cracks appear in tiles (not just surface chips), moisture may be working underneath, it may signal a base failure and warrant professional evaluation. In cold climates, proper slope and drainage are essential to prevent water from freezing beneath tiles and popping them loose.
Budget-Friendly and Luxury Tile Ideas
On a tight budget, stamped or stained concrete delivers the look of expensive stone for a fraction of the cost. A basic pour runs $8–15 per square foot: stamping and staining add $5–10 per square foot. Ceramic tiles from big-box retailers offer decent durability at $3–8 per square foot. Skip ultra-glossy finishes: matte or textured holds up better outdoors and hides wear. Choose a simple pattern, straight-lay or running bond, and a neutral color to stretch your dollars and reduce installation complexity.
Permeable pavers are an upfront investment ($15–20+ per square foot) but may qualify for stormwater rebates in environmentally conscious municipalities, offsetting cost. Check with your local building department.
Mid-range choices include mid-grade porcelain ($8–15 per square foot) with textured finishes and earthy colors. Regional stone, limestone in Texas, slate in the Northeast, can be more affordable than exotic imports. Installing in a simple pattern saves labor costs: herringbone or intricate borders bump labor by 20–30%.
Luxury options include natural stone like granite or travertine ($20–40+ per square foot), large-format porcelain tiles that mimic marble ($15–30), and custom designs. Southern Living and Sunset regularly feature high-end outdoor spaces that blend premium materials with smart design. A luxury patio often includes radiant heating or slip-resistant treatments, adding $5–10 per square foot.
Budget for installation labor, typically $10–30 per square foot depending on region and pattern complexity, and add 10% for waste and cuts. Material costs vary by season and region: spring demand drives prices up. Buying off-season and storing tiles properly (flat, protected) saves money. Get quotes from at least two installers: the cheapest isn’t always the best, ask for references and check their warranty on workmanship.